AdvertPlaces
Banner Ads Purchase System
- by: balambasik
- codecanyon.net/user/balambasik/portfolio
- email: balambasik@gmail.com
Plugin Description
Website owners are often contacted by people who want to place their advertising banners on the website.
Everyone knows how much time and effort it takes to coordinate the placement of banners.
AdvertPlaces is designed to greatly simplify the purchase of banner advertising spaces on your website.
The advertiser won't even have to contact you to place their banner.
He or she only needs to register an account, sign in to the advertiser's cabinet, add the banners, replenish the account - and that's it!
The owner of the website will receive the money, while the advertiser will get clicks on the banners.
Plugin Installation
1. Visit "Plugins > Add New".
2. Click "Upload Plugi".
3.Select zip-archive with plugin and click "Install Now".
4. Activate AdvertPlaces from your plugins page.
Admin Interface
The plugin has an intuitive interface.
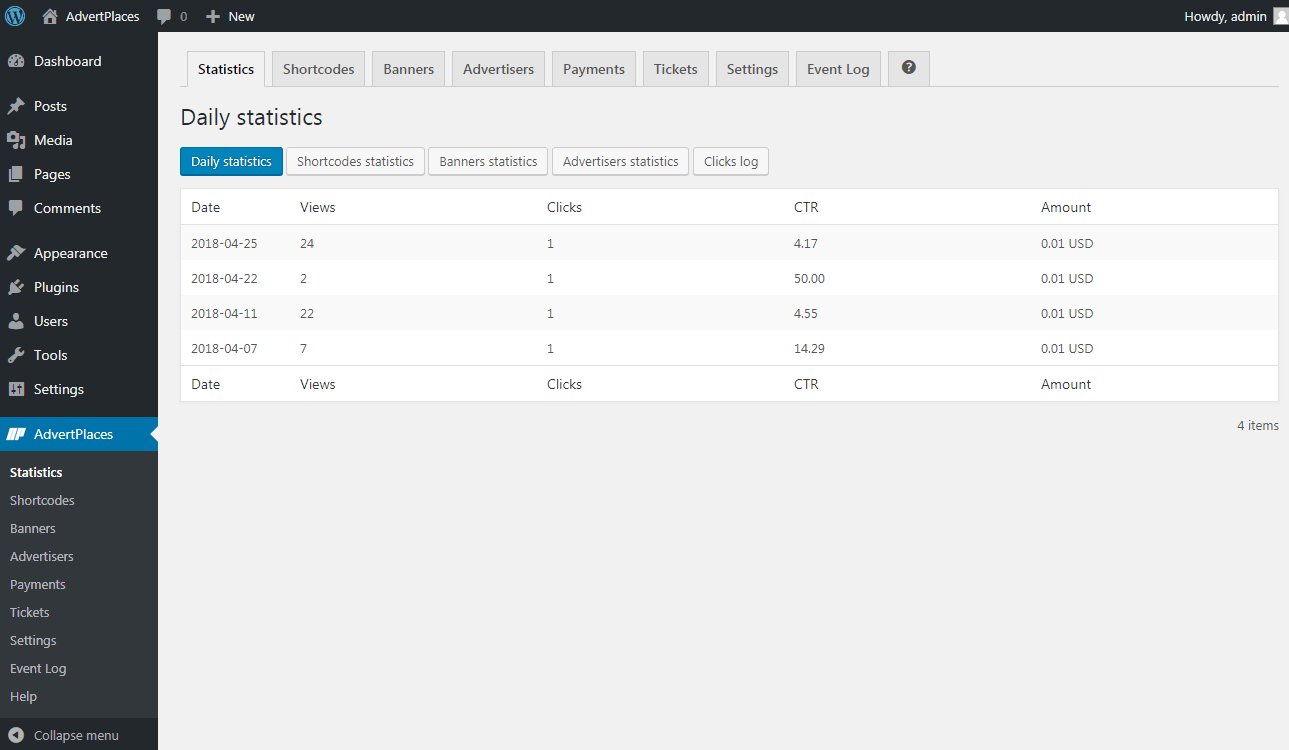
Statistics
Daily statistics
This tab displays the general statistics by day.
Column values:
Views – the total number of views all the banners have obtained.
Clicks – the corresponding number of clicks.
CTR – the average CTR of all banners in the system.
Amount – the total amount spent by all the advertisers on a particular day.
Shortcodes statistics
This tab displays the general statistics for the shortcodes. That is, for the banner spaces, since a banner will be displayed in the place of the shortcode. You can sort the statistics by date or by date range.
Column values:
Views – the total number of views the shortcode (the banner space) has obtained.
Clicks – the total number of clicks on the shortcode (the banner).
CTR – the CTR of the shortcode.
Amount – the amount the shortcode has "earned".
Banners statistics
This tab displays the general statistics for banners. The table displays all the banners you have added to the system. You can sort the statistics by date or by date range.
Column values:
Banner name – the name of the banner which the advertiser specified when uploading it.
User – the login of the advertiser that uploaded this banner.
Image – a preview of the banner. You can click on the thumbnail to enlarge the image.
Size – the dimensions of the banner (width x height).
Views – the number of views the banner has obtained.
Clicks – the number of clicks on the banne.r
CTR – the CTR of the banner.
Amount – the amount that has been charged for the clicks on the banner.
Advertisers statistics
This tab displays the general statistics for advertisers. You can sort the statistics by date or by date range.
Column values:
Name – the advertiser's login.
Views – the number of views all banners of the advertiser have obtained.
Clicks – the number of clicks on the advertiser's banners.
CTR – the average CTR of all banners of the advertiser.
Amount – the amount which the advertiser has been charged for the clicks.
Clicks statistics
This tab displays the statistics on clicks. The information on each click is stored here.
Column values:
User – the advertiser's login.
Banner name – the name of the banner.
Image – a preview of the banner. You can click on the thumbnail to enlarge the image.
Size – the dimensions of the banner (width x height).
CPC – the cost per click.
Type – the type of device the click was made from (PC, tablet, smartphone).
Platform – the platform (OS) using which the click was made. (Windows 10, Android, Mac OS, etc.)
Browser – the browser using which the click was made.
Geo – the country from which the click was made.
IP – the IP address using which the click was made.
Url – the URL address to which the banner leads.
Date – the date and time of the click.
Shortcodes
The following example will help you understand what shortcodes are.
For instance, you want to sell a 728x90 banner in the footer of the website.
To do this, you need to create a shortcode with a banner size of 728x90 and add it to your theme template.
(Below, we'll discuss how to add a shortcode to the theme file)
After that, a standard banner will be displayed in the footer of your website, indicating this banner space is for sale.
Instead of the standard banner (placeholder), you can add a Javascript code of a third-party banner system. For example, Google Adsense.
A standard banner (placeholder) will be displayed if advertisers have not purchased this banner space.
Now, the step-by-step guide.
1. Go to the "Shortcodes" tab and click on "Add Shortcode"
2. You can see the window for adding a shortcode.
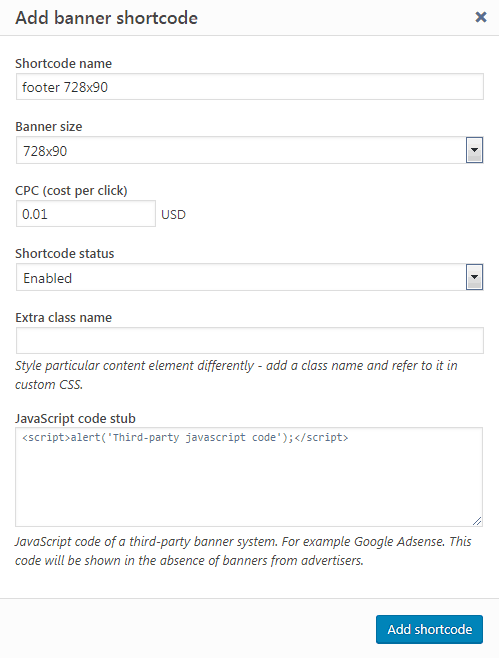
Let's have a look at the settings:
Shortcode name – here, you can specify the name of the shortcode; you can give the shortcode any name, since only you can see it.
Banner size – the size of the banner that will be displayed in place of the shortcode.
CPC – the minimum cost-per-click (CPC). You can set the minimum CPC for this banner space. All advertisers' banners with a CPC below the specified minimum will not be displayed in this banner space.
Shortcode status – you can enable/disable the display of banners in this place.
Extra class name – the name of the custom CSS class (or classes).
JavaScript code stub – the code of the third-party banner system. For example, Google Adsense.
If advertisers have not bought this banner space, then it will display the code of the third-party banner system (if any); otherwise, it will display a standard banner (placeholder).
After filling in all the information, click on "Add shortcode".
Congratulations, you have created your first shortcode!
Now, you need to place it within your theme in the position where you want to display banners. In our case, it's the footer of the website.
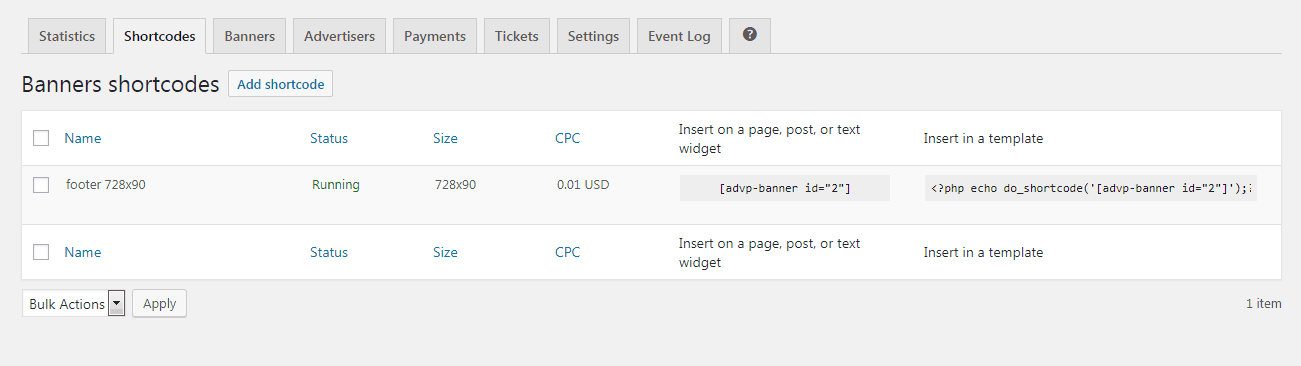
To place it, you will need to manually add the code for the shortcode to the theme files. If you have the WPBakery Page Builder plugin (formerly Visual Composer) installed, you can use it to add the shortcode. You can also add the shortcode directly to the article.
After adding the code, go to the website. In the place where you added the shortcode, you should see a standard banner (placeholder). In our case, it's a placeholder as seen in the picture below.

This way, you can create as many shortcodes as you like.
Moderation Of Banners
To avoid endangering the audience of your website, you should check all the banners uploaded by advertisers. Keep in mind that unscrupulous advertisers can provide a link leading to a malicious website.
If there are new unverified banners in the system, the sidebar and the "Banners" tab will feature a red icon with the number of banners waiting to be checked. All the newly added banners have "Moderation" as their status.
Each banner added by the advertiser will not go on display until you check it. To moderate the banner, go to the "Banners" tab and hover the cursor over the banner. There will pop up the menu offering the available actions for the banner.
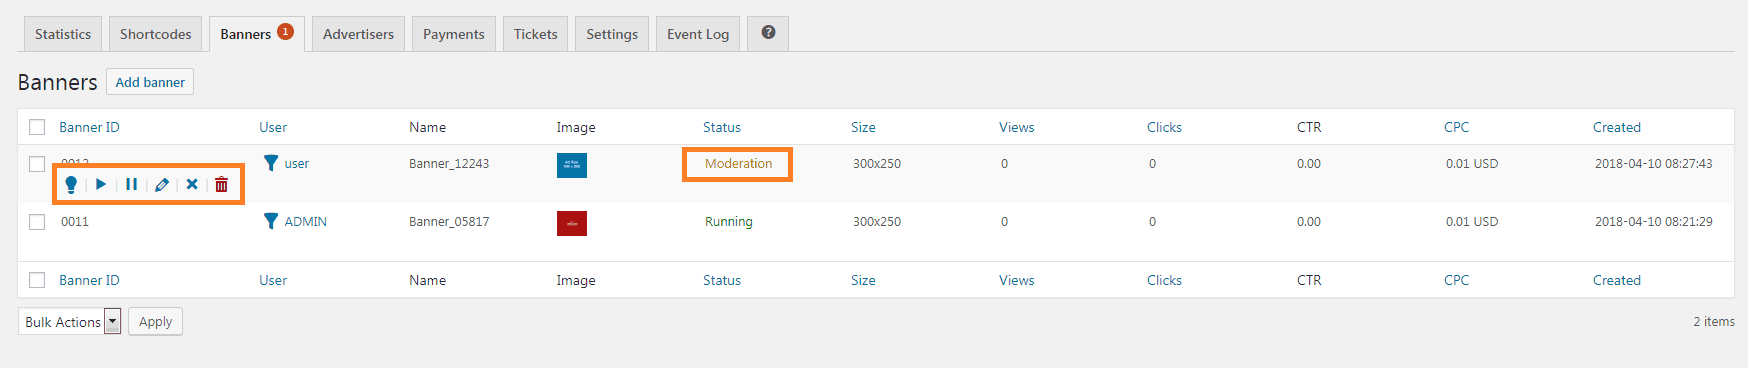
To check the banner, click on the "Lightbulb" icon. There will show up the pop-up window for checking the banner.
Following the instructions, perform the banner check. To approve or reject the banner, click on the corresponding button: "APPROVE" or "REJECT"
Adding your own banners
As the administrator, you can add your own banners.
You can add banners and link them to the account of any advertiser. To add a banner, go to the "Banners" tab and click on the "Add banner" button. You will see a pop-up window for adding a banner.
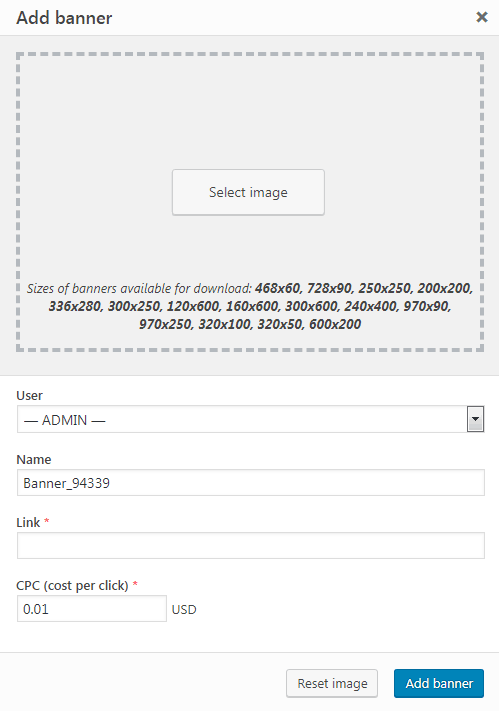
Let's have a look at the parameters.
In the upper part, there is the block for uploading images.
User – a drop-down list. You can select the advertiser's account to which the banner will be added.
Name – the name of the banner; you can give it any name.
Link – the URL address of the banner.
CPC – the cost per click.
After filling in all the fields, click on the "Add banner" button. Once the banner is added, it will feature the "Stopped" status. Thich means the banner is not on display.
In order to put the banner on display, click on the "Play" button. The status of the banner should change to "Running."
Payments
The "Payments" tab shows all the payments received from advertisers.
The Payments stats block displays the general information on payments. The information is broken down by dates: today, yesterday, last week, last month, all the time.
Payer – the number of payers; the number of advertisers who have made a payment.
Payments – the number of all payments made by advertisers.
Amount – the total amount of payments; the sum of all the funds contributed to the system by advertisers.
The Payer and Payments values can be different, since one advertiser can make a payment several times.
The Payment history section displays all the payments received from advertisers.
Warning!
Only successful payments are saved in the Payment history; the system does not save unsuccessful payments.
Column values:
Payment ID – the internal payment identifier
Username – the advertiser's username (the username which the advertiser used when registering an account on the website). If this field's value is "undefined", this means the advertiser's account has been deleted.
Payment Details – the payment details transferred by PayPal through API during the payment. Here, you can find absolutely all information about the payment.
Transaction ID – the identifier of the payment.
Payer ID – the identifier of the payer. In the administrator has manually changed the advertiser's balance, the payment identifier will have the value "MANUAL".
Payer Name – the name of the payer.
Payer Email – the email address of the payer.
Amount – the amount of payment. This value may be negative if the administrator has manually changed the advertiser's balance.
Payment Status – the status of the payment. A successful payment has the status "Completed".
Payment Date – the date and time of the payment.
To see the payments made by a particular advertiser, click on the "funnel" icon next to the advertiser's login, in the "Username" column.
Advertisers
The advertisers are ordinary users registered on your website.
However, to be included in the list of advertisers, the user must replenish their account at least once. After a successful replenishment, the user is included in the list of advertisers.
Column values:
Username – the advertiser's username in the system
Email – the advertiser's email
Banners – the link to the advertiser's banners
Tickets – the link to the correspondence between the advertiser and the administrator
Payments - the link to the advertiser's payment history
Amount - the current amount of funds in the advertiser's account
You can change the advertiser's account balance. To do this, click on the icon next to the amount. In the pop-up window, specify the replenishment amount to be credited to the account of the advertiser. You can enter a negative amount. In this case, the specified amount will be written off from the advertiser's account balance.
Warning!
All balance changes are saved in the payment history. They are visible to both the website administrator and the advertiser.
Adding new advertisers.
You can create new advertisers. To do this, you only need the email of the person for whom you want to create an advertiser account. To create a new advertiser, click on the "Add advertiser" button and fill in the required fields in the pop-up window. The new advertiser's authorizing information will be sent to the email you specified.
Tickets
The "Tickets" tab displays messages from advertisers. If you have new unread messages, the "Tickets" tab and the sidebar will feature a red icon with the number of unread messages.
Settings
PayPal account email – your PayPal account. If this field is empty, you will not be able to accept payments from the advertiser.
Size of banners available for upload – the sizes of banners allowed for upload. For example, if you only sell 300x250 and 728x90 banners on your website and do not offer other sizes (that is, if you haven't even create shortcodes for banners of other sizes), then it makes sense to disable the uploading of banners other than the 300x250 and 728x90 sizes. Otherwise, advertisers may add banners of the sizes for which no banner space is available. Consequently, these banners will not be on display.
Plugin mode – choose between the single-user or multi-user plugin modes. In the single-user mode, you will simply place your banners. There will be no advertisers. Other than you, nobody can add banners to the system. The multi-user mode enables advertisers to upload banners.
Important!
Do not switch the plugin to the single-user mode if you have active advertisers! They may still be unspent money in their accounts! When the plugin is switched to the single-user mode, your advertisers will not have access to their advertising cabinets.
Event Log
The event log records all actions of the administrator and the advertisers.